You can do that in a number of ways. The most physically correct way would be to go out and capture a background plate image using a camera mounted to a moving vehicle with a reasonably long exposure like the images I made for the City streets Night Image Pack . That however isn’t always very easy. It requires a lot of expensive equipment, time and patience to get the right shots (and quite a bit of luck).
The other way to do it is to use a static background plate and add motion blur to this. Thats pretty straightforward if you have a straight enough road, you can add motion blur in various way using Photoshop CC.
The second, bigger problem you’ll have is that your HDRi map will be taken from a static location and wont have any motion blur, so you’ll have a motion blurred background with a car that reflects a static HDRi map.
Now, there is software out there that will allow you to accurately blur a curved HDRi sphere, Virtual Rig Studio will do it using lots of vectored blur paths, but you’ll need a hefty chunk of cash to afford it at $2500 for the professional version. I don’t have that kind of cash! So I discovered a way of getting motion blur into my HDRi maps using software that I already own.
So, in this little tutorial I’m going to show you a little trick that you can use to get a blurred motion blurred effect in your HDRi maps that is simple, quick and wont cost you the earth.
You’ll need a panoramic photo stitcher that supports HDRi images. I use PTGui to create all the HDRi maps on the store. It’s exremely powerful and is only $104 for the personal version.
So, First we need to load in the HDRi map that you would like to blur into PTgui.

The image will come in as a Rectilinear projection so first we need to change that, Go to the Panorama Editor and under the Projection menu select “Spherical 360 x 180 Equirectangular“.
You’ll see your HDRi map layed out as you expect it.
Now we’re going to rotate it so that the road is aligned vertcially in the image. Click the Numerical Transform icon (the “123”) and rotate the pitch by -90. Depending on the orientation of your HDRi you might find that you need to add rotations in the yaw and roll to get the road surface to align vertically. Sometimes it can be just a case of trial and error until you get it right.
Goto the Create Panorama tab and set the image size (16000 x 8000 is the optimum size for this image), and in the Output settings deselect “Tone Mapped Panorama” and make sure “HDR Panorama” is selected.
Set your Output directory and hit Create Panorama
Save the image as a HDR file. I usually call mine Nadir.hdr

Load the Nadir.hdr image you just saved into Photoshop. Now you’ll have an image where you’re looking directly down at the roads surface, that means we can cheat a bit and add some motion blur. You can do it a couple of ways but I find it best just to use Filter>Blur>Motion Blur and set the direction to -90.
Because this isn’t physically accurate (the motion blur is uniform across the image when in reality it should be fastest in the centre and falloff towards the top and bottom) I usually just place this motion blurred layer on top of the original image and use the eraser brush with a soft falloff to paint out a horizontal section a the very top and bottom of the blurred layer allowing the non-blurred image to come through at those points. Then save your image as a new .hdr file. Nadir_Blurred.hdr

Go back into PTGui and open a new project. Load in your Nadir_Blurred.hdr. As before, Go to the Panorama Editor and under the Projection menu select “Spherical 360 x 180 Equirectangular“.
This time Click the Numerical Transform icon (the “123”) and rotate the pitch by 90.
You’ll see that you’ve now got a motion blurred version of your original HDRi map! All you need to do now is output the Panorama as you did before using Create Panorama and you’re done.
A Motion Blurred Spherical HDRi map.

When you combine this little trick with a blurred background plate you will get great motion not only in your background plate but also in the car body reflections.
Here’s a couple of example of a HDRi (City Buildings 02) which has been blurred along with a Photoshop blurred background plate image.

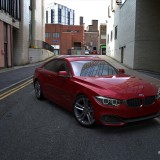
BMW Rendered using a motion blurred HDRi map. Background plate Blurred in Photoshop CC
This is just the Blurred HDRi, theres no background plate, the BG effect is purely the HDRi. (City Buildings 02)

BMW Rendered using a motion blurred HDRi map for lighting, reflections and background
Heres a speed up video of the proccess of rendering the GT 40 image.
 City Buildings HDRi + Backplates
£ 5.99–£ 35.00
City Buildings HDRi + Backplates
£ 5.99–£ 35.00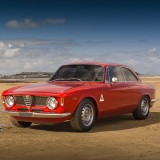 Beach Sunny
£ 2.00–£ 8.00
Beach Sunny
£ 2.00–£ 8.00 General HDRi Collection
£ 9.99–£ 44.99
General HDRi Collection
£ 9.99–£ 44.99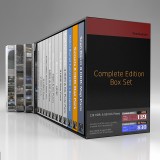 Complete Box Set
£ 75.00–£ 199.99
Complete Box Set
£ 75.00–£ 199.99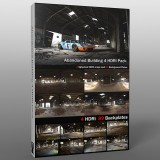 Abandoned Building bundle
£ 14.99–£ 75.00
Abandoned Building bundle
£ 14.99–£ 75.00 Automotive Rendering Pack Vol 2
£ 49.99–£ 199.00
Automotive Rendering Pack Vol 2
£ 49.99–£ 199.00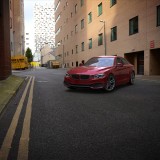 City Buildings 02 HDRi Set
£ 5.99–£ 35.00
City Buildings 02 HDRi Set
£ 5.99–£ 35.00 Motion Blurred Tunnel Pack
£ 5.00–£ 45.00
Motion Blurred Tunnel Pack
£ 5.00–£ 45.00 16 HDRi map Automotive Packby cm
 City Streets Night Image Packby cm16 HDRi map Automotive Packby Manuel16 HDRi map Automotive Packby theninj

